
You’ve probably heard that a bottle of stop-leak additive will fix any oil leak for good. Here’s what the data actually shows: most of those products are temporary band-aids, and the real fix depends on understanding why the leak started in the first place. Oil leak repair isn’t about dumping in a magic fluid—it’s about diagnosing the root cause: degraded seals, worn gaskets, or even the wrong viscosity grade. As a petroleum engineer who spent years formulating lubricants, I’ve seen too many engine failures caused by a quick-fix approach. Let’s break down how to approach oil leak repair with the right chemistry and mechanical logic.
You’ve Probably Heard That Stop-Leak Additives Work Long-Term
Most commercial stop-leak products contain a swelling agent—usually a ester or a mineral oil-based compound—that causes rubber seals to expand. This can buy you time, especially for high-mileage engines where valve cover gaskets or rear main seals have hardened over years of heat cycling. But here’s the trade-off: overuse or the wrong chemistry can over-swelling, making seals brittle and actually accelerating failure. Data from used-oil analysis labs shows that vehicles treated repeatedly with stop-leak additives often show elevated viscosity and sheared-down additive packages. If you’re considering an additive as part of your oil leak repair strategy, limit it to one treatment and monitor the leak. For a permanent fix, you’ll need to replace the sealing component.

Science Corner: Why Oil Leaks Happen in the First Place
Oil leaks are fundamentally about seal deformation, thermal degradation, or pressure imbalances. Seals—whether rubber (NBR, ACM, FKM) or flexible metal—are designed to maintain a specific compression set. Over time, heat cycles cause the polymer chains to relax; the seal loses its ability to conform to mating surfaces. Add in contamination from old, acidic oil or coolant, and the seal’s material properties change. This is why switching to a high-quality synthetic oil with robust detergent and dispersant chemistry can sometimes slow a leak—it reduces deposit buildup around seal interfaces. But it won’t restore a seal that has already taken a permanent set. Understanding this is the first step in any oil leak repair: is the seal still elastic, or is it a goner?
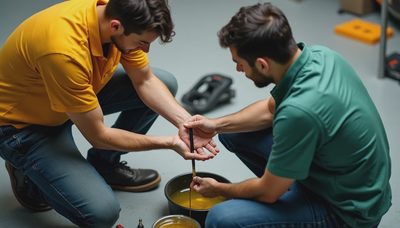
Diagnosing the Leak: Reading the Drops
Before you buy any parts or additives, pinpoint the source. Clean the engine bay thoroughly, then drive for a day and inspect. Common leak locations include:
- **Valve cover gaskets**: drips on the exhaust manifold, burning oil smell.
- **Oil pan gasket**: pooling under the engine center, often after parking.
- **Rear main seal**: leak between engine and transmission, visible as a drip from the bell housing.
- **Timing cover gasket**: leaks near the front of the engine, often confused with water pump leaks.
A UV dye kit is a cheap investment—add a small amount to the oil, run the engine, and use a black light to trace the exact origin. This prevents you from replacing the wrong part, which is a common mistake in DIY oil leak repair.
Choosing the Right Repair Path: Gasket, Seal, or Additive?
Once you know the source, decide on the approach:
- **Hardened gaskets** (valve cover, oil pan) are best replaced. Gasket sets are inexpensive, and the labor is straightforward for most DIYers. Use a torque wrench and follow OEM specs.
- **Rear main seals** are labor-intensive; if the leak is minor and not leaving puddles, a high-viscosity oil (e.g., 10W-40 instead of 5W-30) might reduce the drip by increasing internal resistance. This is a valid temporary oil leak repair technique, not a fix.
- **Stop-leak additives** are appropriate only for leaks from dry, cracked seals that still have some flexibility. They will not fix a gasket that is physically torn or misaligned.
I recommend a simple test: after cleaning, place a piece of cardboard under the engine. Measure the drip spot diameter over 24 hours. If it’s smaller than a quarter and not growing, you may be able to live with it by checking oil levels weekly. If it’s larger than a dollar coin, plan for mechanical repair.

When to Take It to the Shop
Some leaks require specialized tools or engine removal. Rear main seal replacement on many front-wheel-drive cars involves removing the transmission. Timing cover resealing on modern engines often requires alignment tools. If your leak is from these areas and you’re not confident in your mechanical skills, pay a professional. The cost of a repair might be $400–$1,200 for a rear main seal, but a botched DIY job can lead to a $3,000+ engine replacement. Remember: the goal of oil leak repair is to stop the leak, not create a new problem.
Preventing Future Leaks: Oil Viscosity and Maintenance
The best oil leak repair is prevention. Use the OEM-recommended viscosity grade—going thicker than spec can increase pressure on weak seals, actually causing leaks. Change oil at intervals no longer than the manufacturer’s severe-service schedule (typically 5,000–7,500 miles). Acid buildup in old oil attacks seal elastomers. For high-mileage engines, consider a high-mileage oil formulation, which contains seal conditioners designed to gently swell dried seals without overdoing it. Read the spec, not the bottle: look for API SP or SN Plus and a viscosity grade that matches your owner’s manual.
If you remember one number from this post, make it this one: a slow leak that loses less than a quart between changes (roughly 1,000 miles per quart) is manageable. Anything faster needs mechanical oil leak repair. Don’t let a small drip become a hydro-locked engine or a fire hazard. Your oil is the lifeblood of your engine—keeping it inside is worth the effort.


No letters yet — pray write the first.